Where to predefine rates for a shipment by capturing key details like POL, POD, loading/discharge agents, service type, service term, container info and rate details? - Rate Request User Manual
📘 Rate Request (RR) – User Manual
Version: V.1.0.32
Prepared by: Ramya R
Date: 28/07/2025
📁 Table of Contents
Introduction
System Requirements
Logging In
Main Features and Functions
4.1 Finding and Creating a Rate Request
4.2 Mandatory Fields
4.3 RR Number and Validity
4.4 Additional Details
4.5 Detailed Field Descriptions
4.6 Submitting, Approving, and Managing RR
4.7 Post-Submission Actions
4.8 RR Status Summary ViewTroubleshooting Common Issues
Frequently Asked Questions (FAQs)
Support
🔹 1. Introduction
The Rate Request (RR) module in Zealit 2.0 allows users to create, manage, and submit rate requests based on shipment and trade details. The module ensures rates and costs are properly captured and associated with specific container and customer data.
🔸 2. System Requirements
Supported Browsers:
Google Chrome version 90 or above
Mozilla Firefox version 85 or above
User Access Role:
Sales, Pricing, or Operations team member with RR module access
🔐 3. Logging In
Open Zealit 2.0 in your preferred browser
Log in using your credentials
Navigate to the RR screen via the dashboard
⚙️ 4. Main Features and Functions
🆕 4.1 Finding and Creating a Rate Request
To find and create a new Rate Request (RR):
Type “Rate Request” in the search field OR
Navigate through: Trade → Quotes → Rate Request
In the Rate Request screen, click Create New to initiate a new request
To create a Rate Request from an existing MRG:
Use the Filter button to locate the required MRG
Review details such as Place of Origin, Loading, Discharge, Final Destination, Rate, Container Type
Enter Number of Containers as required
Click Create against the selected MRG
✅ 4.2 Mandatory Fields
The following fields must be completed to create a Rate Request:
Booking Party – Select from dropdown (must be sales linked)
Customer Sales Link – Ensure the customer is linked to a salesperson
Number of Containers – Enter the quantity
These fields are validated before submission. Data such as commodity, shipment route, and container type are auto-fetched from the selected MRG.
🏢 4.3 RR Number and Validity
RR Number – Automatically generated upon saving
Date – Auto-filled with today’s date
Valid Till – User-defined validity for the RR
📄 4.4 Additional Details
Booking Party – Auto-fetched from the selected MRG
Salesperson – Auto-assigned based on customer sales link
Shipment Type – Select Export or Import
Reference – Enter a unique identifier for tracking
📦 4.5 Detailed Field Descriptions
📍 General Shipment Details
Place of Origin – Auto-fetched from MRG
Place of Loading (POL) – Auto-fetched from MRG
Place of Discharge (POD) – Auto-fetched from MRG
Loading Agent – Select from dropdown. If missing, add in Agency Master.
Discharge Agent – Agency at POD handling cargo
Optional POD – Final delivery location (non-mandatory)
POD Tariff – Tariff related to Optional POD (non-mandatory)
Cargo – General description (e.g., steel, onion)
Status – RR status (Pending, Approved, etc.)
Service Type – FCL/LCL
Transshipment Agency – Fill if transshipment required
🚢 Container Details Tab
Container Type
Indicates the type and size of container such as 20ft, 40ft, open top, flat rack, etc.
Value is auto-fetched from the associated MRG and reflects the shipment configuration.
This field is locked to maintain data consistency with rates and costs mapped in the system.
Commodity Code – Auto-fetched and frozen from the MRG
Container Number – Input quantity of containers to be booked
Import/Export Special Free Days – Choose Yes/No; enter number of days if Yes
Free Days – Specify free days separately for Import and Export (if applicable)
DG Class – Required for hazardous cargo; select appropriate class
Cargo Description – Auto-filled from commodity; editable for detailed input
Add Button – Click to save container entry
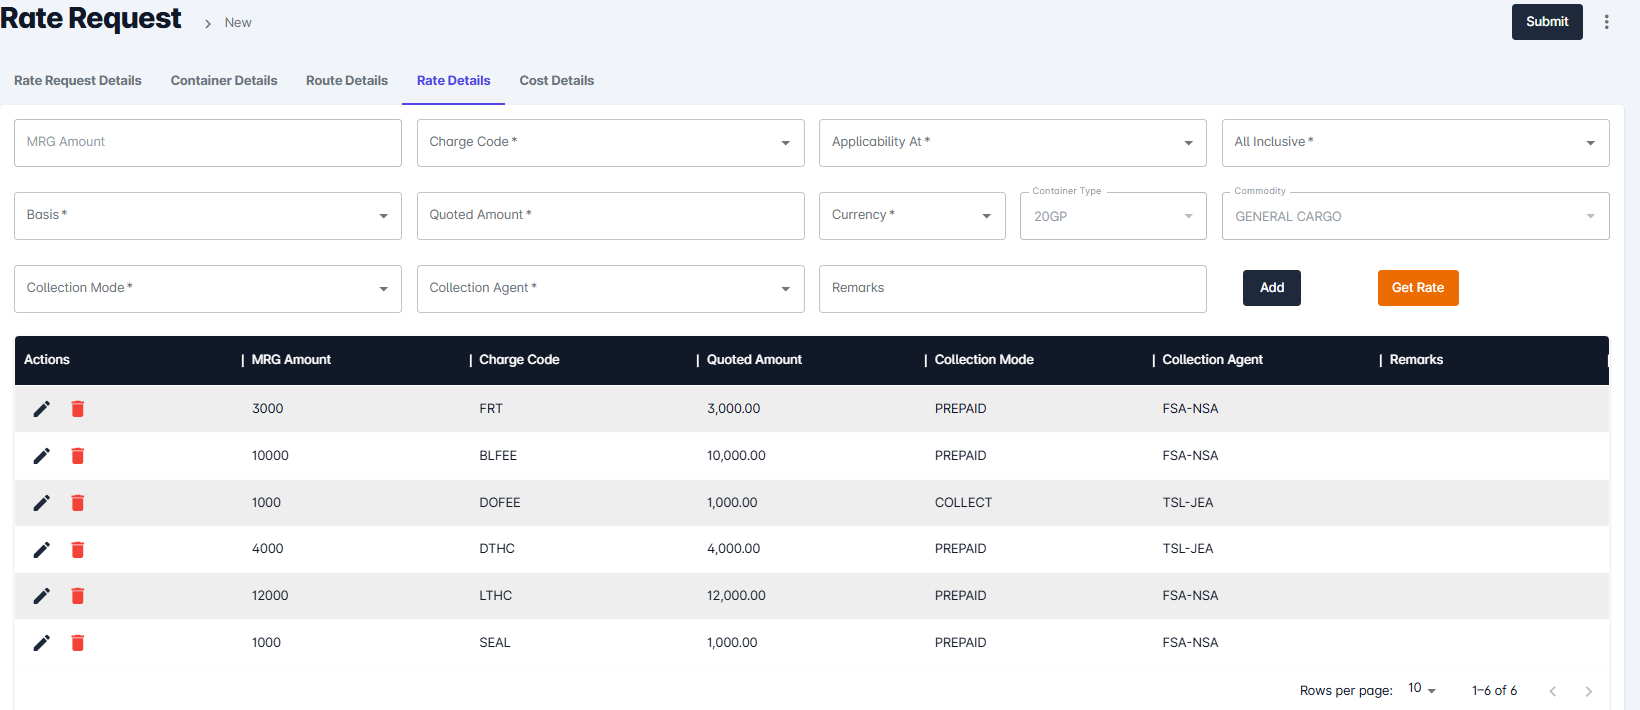
💲 Rate Tab
This section displays rate-related details and allows for both auto-fetching and manual entry of charges.
-
Rates are automatically fetched from the selected MRG and any defined Port Local Charges.
-
These auto-filled values are based on trade route, container type, and commodity, ensuring consistency.
If needed, you can manually input rate details by filling the following fields:-
Charge Code – Select the appropriate rate charge (e.g., Ocean Freight) from the dropdown.
-
Applicability At – Specify where the rate applies (e.g., POL, POD).
-
All Inclusive – Tick if this rate includes all components.
-
Basis – Choose the rate basis (e.g., per BL, per Container, KM, Ton).
-
Quoted Amount – Enter the applicable rate value.
-
Currency – Select the corresponding currency.
-
Container Type – Auto-fetched from the MRG and frozen (cannot be edited).
-
Commodity – Auto-fetched from the MRG and frozen.
-
Collection Mode – Choose Prepaid or Collect as per agreement.
-
Collection Agent – Select the responsible agent for collecting or paying.
-
Remarks – Enter any relevant comments for the rate entry.
Click Add to save the rate line into the RR.
💰 Cost Tab
Charge Code – Select appropriate cost head
Basics – Define charge basis (e.g., BL, Container, KM, Ton)
Container Type – Auto-filled from MRG
Quoted Amount – Enter the quoted charge
Currency – Choose correct currency (e.g., USD, INR)
Commodity – Pulled from MRG
Responsible Agent – Assign cost responsibility
Remarks – Enter additional notes if needed
Click Add to save cost line
📤 4.6 Submitting, Approving, and Managing RR
Click Submit after all details are entered:
A new RR will be created with a number like RR2025000001HLP/INMAA/AEJEA
Status = Pending Approval
🔄 4.7 Post-Submission Actions
Approve – Finalize RR; enables Create Booking option
Reject – Discard the RR if no longer required
Re-Quote – Edit and re-submit the RR
Copy – Duplicate RR for creating similar requests
View Charge Breakup – Breakdown of rate and cost
Print – Use print icon to generate physical copy
Filter – Filter RRs based on multiple criteria
Download – Export complete RR data from top-right corner
📊 4.8 RR Status Summary View
RRs are categorized based on their current state:
Pending – Awaiting approval
Approved – Finalized; ready for booking
Rejected – Not approved; marked as void
Re-Quoted – Resubmitted after revision
Use status tabs in the dashboard to view each category.
🛠️ 5. Troubleshooting Common Issues
| Issue | Suggested Solution |
|---|---|
| RR not creating | Ensure all mandatory fields are filled |
| Booking party not visible | Check customer-salesperson link setup |
| MRG not showing | Confirm MRG is Active and matches filters |
| Auto-fill not working | Verify MRG data and check internet connection |
❓ 6. Frequently Asked Questions (FAQs)
Q1: Can I edit an RR after creation?
✅ No, RRs are locked after submission to maintain integrity.
Q2: Why is profit not showing despite rate and cost?
✅ Ensure the RR is based on a valid MRG with correct mapping.
Q3: Can I create multiple RRs easily?
✅ Yes, use the Copy function to duplicate existing RRs.
🏠 7. Support
For assistance or technical issues, please contact:
📧 helpdesk@aggrandizeventure.zohodesk.in
Related Articles
CONSOLIDATED USER MANUAL FOR NVOCC
1.MASTERS PORT LOCAL CHARGES : https://support.aggrandizeventure.com/portal/en/kb/articles/where-to-set-the-contract-rate-cost-for-services-at-each-port-port-local-charges-definition DEPOT MASTER : ...Transport Rate Request User Manual (Tariff Master Flow)
Transport Rate Request User Manual Version: V.1.0.27.1 Prepared by: Issac Date: April 14, 2025 Table of Contents Introduction System Requirements Logging In Main Features and Functions 4.1 Accessing the Transport Rate Request Module 4.2 Creating a ...COC RATE REQUEST - USER MANUAL
COC Rate Request – User Manual Version: V.1.0.37.5 Prepared by: Rajiv Issac Date: 10/11/2025 Table of Contents Introduction System Requirements Logging In Main Features and Functions 4.1 What is COC Rate Request 4.2 How to Create a COC Rate Request ...COC RATE REQUEST - USER MANUAL
COC Rate Request – User Manual Version: V.1.0.11 Prepared by: RAJIV ISSAC Date: 10/11/2025 Table of Contents Introduction System Requirements Logging In Main Features and Functions 4.1 What is COC Rate Request 4.2 How to Create a COC Rate Request ...COC RATE REQUEST - USER MANUAL
? COC Rate Request – User Manual Version: V.1.0.11 Prepared by: RAMYA R Date: 08/11/2025 ? Table of Contents Introduction System Requirements Logging In Main Features and Functions 4.1 What is COC Rate Request 4.2 How to Create a COC Rate Request ...